 _D7K2467
“That’s not a landscape photo.”
“Why not?”
“Because there’s a person in it.”
This is, almost verbatim, an exchange I had with a student on one of my courses a long time ago. Politely, of course, I begged to differ. Partly because I’m not that fussed about whether any particular photo is, or isn’t, a ‘Landscape’ (capital ‘L’ essential, I think) – and partly because I think that the human element often adds meaning to images. It can help to give the viewer a sense of connection or involvement with the landscape, and it often helps give a better sense of scale too.
For me, there are lots of situations where I want a figure in some of my shots, and I don’t always have anyone else at hand to act as a model. This means that the only option is to become my own model. If the figure is to be static, it isn’t terribly hard to do, but there are still a few things to think about.
So let’s look at Putting Yourself in the Picture (PYITP for short). First of all, you have to have some way of triggering the camera when you aren’t right behind it.
Trigger happy
The most obvious of these is the self-timer. Most cameras have one of these, though in some cases you might have to ferret around in the menus to find it. This fires the shutter at a set interval after you press the button, giving you time to stroll, or possibly sprint, into the required position. Ten seconds seems to be a standard interval, though some cameras allow you to select longer or shorter times too. The Nikon SLRs which I use have a maximum delay of 20 secs, which allows a lot more flexibility, especially when you want to position yourself a significant distance from the camera.
Another possibility is to use a wireless remote control device. A few cameras even come with one in the box, but usually it’s a separate purchase, though not necessarily an expensive one. I’ve got a Nikon ML-L3, a simple little infrared unit which allows the camera to be triggered from a distance of up to 5 metres. List price is just under £20 and you can get it for less. It works with most Nikon SLRs as well as a number of Coolpix and Nikon 1 models. There are comparable products for most other makes.
That 5-metre range is the most obvious limitation – there are 3rd party units which have a much longer range, but at a higher price. The other concern when using such a device for PYITP is that you don’t necessarily want to appear to be obviously pointing something at the camera. My SLRs have a ‘delayed remote’ mode which means that the shutter trips 2 seconds after pressing the remote button – just long enough to conceal the device and rearrange myself into a more ‘natural’ pose.
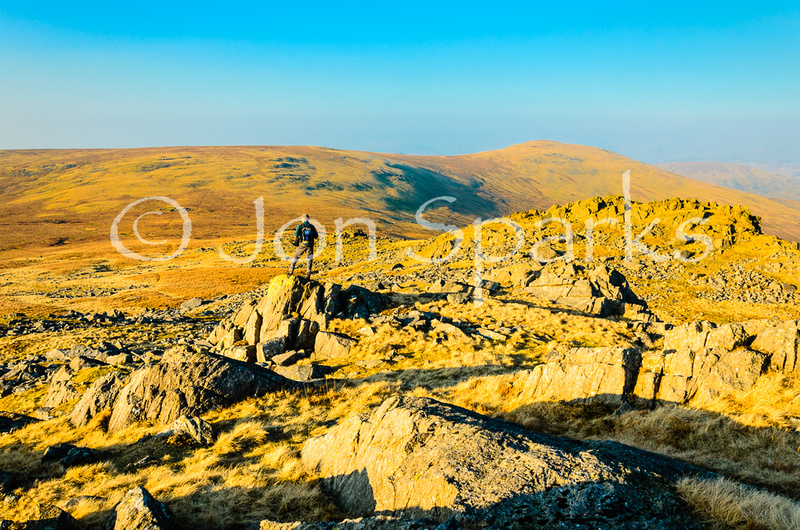
The third, and most flexible option, is to use the interval timer. This allows me to set any delay up to 24 hours, and to shoot an almost unlimited number of images (certainly enough to fill up a memory card and drain the battery!) at intervals thereafter. This is way over the top for PYITP, but it does mean, for example, that if I want to be that tiny figure silhouetted on the edge of the crag I can set a suitable delay of 10 minutes, or whatever it takes. Setting the options takes a fraction longer than using the self-timer, but there are times when this level of flexibility makes it the only viable choice. Of course, not every camera has an interval timer – it’s missing from Nikon’s entry-level D3300 DSLR, for example.
In practice, the one that I use most often is the self-timer. On my Nikons (a D7000 and a D600) there’s also the option to fire a sequence of up to 9 shots, at intervals between 0.5 and 3 secs, For instance, if I set a 20 sec delay and 1 sec interval, the camera will take its first shot after 20 secs, the next at 21 secs (1 sec later) and so on up to 29 secs after first pressing the button.
 _D6C0105
Exactly how I use this depends on the situation and the type of action I’m trying to capture – we’ll look at one or two examples later. But the timing isn’t the only thing that needs to be thought about; for a start, there’s the where as well as the when.
Right time, right place
The ‘where’ aspect is all about the placement, size and visual impact of the figure in the frame. When you have someone else to act as ‘model’ you can judge this easily by eye and through the viewfinder. Unless you’ve worked out how to be in two places at once, you can’t do this when you’re on your own.
This aspect of PYITP can be either challenging or fun, depending on how you embrace it. You have to imagine – or, in a more ‘photographer-y’ word, visualise –where the figure fits into the overall image. Of course you can take a shot and check it on the camera back, but it can be a fairly lengthy process of trail and error unless you can short-cut it with some pre-visualisation.
Experience obviously helps, particularly in developing a sense of how large a figure will appear in the frame when they are at a particular point. Objects of comparable scale, such as walls, gates, signposts, shrubs, can be very useful reference points but they aren’t always there in open settings such as a beach or a mountain ridge. (In fact these are just the settings where a human figure in shot can be particularly powerful in terms of creating a sense of scale).
When you’re using a wide-angle lens, then even quite small shifts in position of the figure can make a big difference to its size and impact in the frame. With longer lenses, a shift of a metre or two may be much less crucial, but you’ll probably have to be farther from the camera to get into the shot at all.
Sometimes there will be obvious landmarks or reference points – scrambling along a mountain ridge, there may be an obvious crest or edge where you’ll be well outlined against the sky or against a distant backdrop. It nearly always pays to identify something, even if it’s just a particular tuft of grass, to aim for once you trip the timer and start scurrying off to get into shot.
When working out where to place yourself, think about the light too –, especially if it’s patchy (e.g. in a forest). One good way to tell if you’re fully illuminated when standing at a certain point is to look at your shadow – is it complete?
Dynamic element
When a static figure is all you need, it all seems relatively straightforward: set the timer, get into position, wait a few seconds (or until you hear the shutter click). Check image on camera-back and if satisfied, move on. When you want an element of action in the shot, it gets harder. In particular, timing becomes much more critical.
Undoubtedly, this is where it really helps to have a camera, like my Nikons (and many others) that can shoot multiple frames via self-timer or interval timer. It’s still hit and miss and it’s extremely hard to get that perfect ‘peak of the action’ shot, but you can certainly improve the odds in your favour.
Let’s look at a couple of real-life examples.
I’m currently working on a book of long (average c100km) road bike rides across the north of England. Wherever possible I’m doing these with someone else, and I’ll certainly take any opportunity offered by other riders randomly encountered en route – but I’ve had to do some of them solo and when doing them midweek there often haven’t been many other cyclists around, let alone on the stretches where I want a photo.
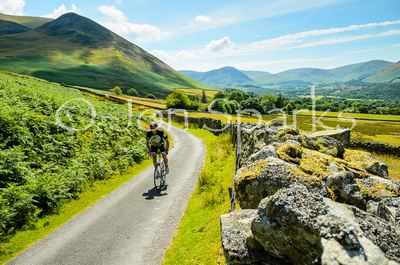
The first problem is that I’m travelling light (I did mention these were 100km rides, often hilly, didn’t I?) So I’m not carrying a tripod, and this means that I’m looking out for anything I can use as a place to set up the camera. In this case I’m on a lane above Lorton in the Lake District (a lovely sneaky was up to Whinlatter Pass, if you’re interested).
Another aspect I should mention is that I want riders in the photos, whether it’s me or someone else, to be travelling in the same direction as the ride is described. And I don’t want every shot to be a rear view. So the view in this shot isn’t what I saw in front of me as I was riding up the lane. In other words, you need eyes in the back of your head.
So, as the lane climbed and before it swung away to the right, I knew there was a good view behind and there was a continuous stone wall alongside which gave lots of potential places to set up the camera. I balanced the handlebar-bag which I use to carry the camera on top of the wall to give a bit of extra height and fiddled about with it until the overall framing looked right. I like the way the edge of the lane goes almost exactly into the corner of the frame, for example.
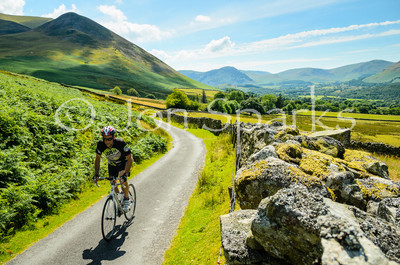
I then set the timer to 20 secs, number of frames to 9 and interval to 1 sec. I knew I needed the time to get a decent way down the road, turn round, clip back into the pedals and get under way again. Even so, on the first attempt I went a little too far and so was still quite small in the frame even for shot no 9. So I tried to adjust my pace a bit and the two shots here are nos 7 and 8 from the second attempt. As you can see, even at fairly moderate speed (it’s steeper than it looks), a cyclist can move a fair distance in a second.
 _D7K9299
 _D7K9300
I think my ideal would have been somewhere between the two shots. I’d really like the second shot if I was maybe half a meter further away – just far enough to get the whole of my shadow into shot. But there was no guarantee that I would do any better on a third attempt, and I needed to think about time, the distance remaining, and so on. I’d probably only spent 5 or 6 minutes at this location, but 5–6 minutes repeated 5 or 6 times adds half an hour to a trip. And that suggests that another aspect of PYITP is picking your locations carefully, so that each one counts.
Tech details: ISO 200); focal length 18mm on APS-C (27mm equivalent); aperture f/9 and shutter-speed 1/320 sec.
The second example also features me on a bike, but it’s a bit different because this was a magazine commission. There was a very specific requirement, to illustrate some of the major Yorkshire climbs which didn’t feature in this year’s Tour de France – but which will feature in the Hoy 100 sportive in September. (Which, by the way, I’ve just entered!).
I’d already spent some time on Park Rash and then moved on to Fleet Moss – Yorkshire’s highest road, climbing to 589 metres. It clouded over for a while so I actually rode down and back up the whole thing, partly to get a workout and partly by way of reconnaissance, but it was already pretty clear that this hairpin just below the top was a great spot to choose.
As I had the car with me I had no shortage of gear and could set the camera on a tripod exactly where I wanted – just as well, as there aren’t many alternative camera platforms hereabouts. Fortunately the band of cloud was moving over and I was getting some nice late afternoon light.
Again I set the timer to 20 secs but because the climb was steep I knew I might need extra time. I wanted to go back down to where it levels out slightly (the bit of road largely hidden by my torso in the picture). I decided that the thing to do was set the interval to the maximum 3 secs and, once I got to the key part and I could hear the shutter, slow right down. It’s not hard to do this as the gradient is around 20%!
Even so, I rode this section five times before I had a shot I was satisfied with – the light was great and, unlike the Lakes shot, my shadow is entirely in frame. The body language is appropriate, too. And obviously it worked, as the magazine used it across a double-page spread.
 D6C_9372-Edit
Tech details: ISO 100 (for maximum dynamic range); focal length 24mm on full-frame; aperture f/11 and shutter-speed 1/100 sec. I didn’t need anything faster as I was going so slowly; if you look at the image at 100% there’s a tiny bit of motion-blur at the top of the front wheel, which doesn’t do any harm at all. Everything else is pin sharp.
Final thoughts
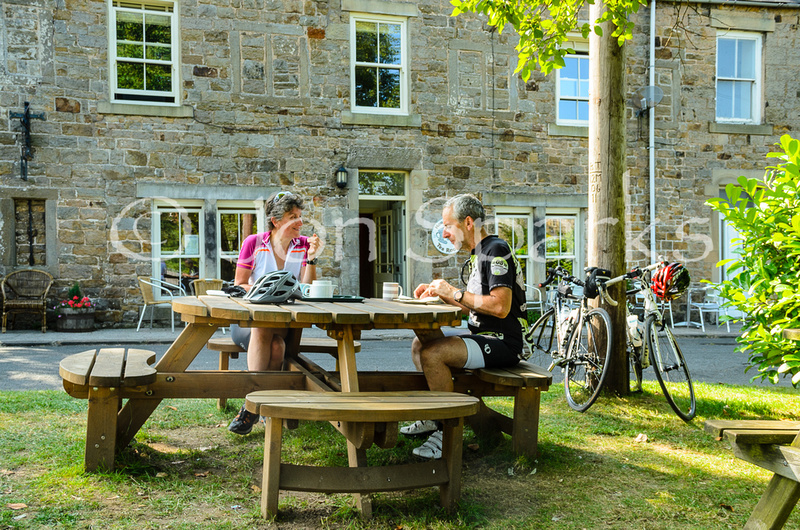
I’ve spent some time working out the finer points of PYITP, especially how it works with the relatively high speeds of cycling. One of these days I want to try it on a mountain bike, where the timing will be all about catching myself riding up or down some significant trail feature or obstacle. I have a plan in mind... but I’ll report back later. Meanwhile, here’s a final, more restful shot – perhaps a more conventional use of the self-timer. And I can recommend the coffee and cakes at House of Meg in Gilsland, Cumbria...
 _D7K0553

